ISO noise reduction is one of the most important topics for photographers who frequently work in low-light environments. Whether shooting concerts, night streets, indoor events, or astrophotography, increasing ISO often becomes unavoidable.
However, higher ISO values amplify not only light sensitivity but also unwanted digital noise, which can reduce image clarity, soften details, and distort colors.
Modern cameras offer impressive high-ISO performance compared to earlier generations, but technology alone cannot eliminate noise entirely.
Understanding how digital noise forms and learning how to control it through smart camera settings, shooting techniques, and post-processing workflows allows photographers to maintain image quality even in challenging lighting conditions.
This guide explores ISO noise reduction from capture to editing, focusing on practical methods that improve results without sacrificing sharpness or natural texture.
ISO Noise Reduction And Understanding Digital Noise

To apply effective ISO noise reduction, it is essential to understand what digital noise actually is. Noise appears as random grain, color speckles, or rough texture in an image and becomes most visible in shadow areas and uniform surfaces such as skies or walls.
Digital noise occurs because increasing ISO boosts the sensor’s signal, including both real light information and electronic interference. In low-light situations, the camera receives less actual light data, so the amplified signal becomes less accurate.
This results in luminance noise, which looks like grain, and color noise, which appears as red, green, or blue specks. Different camera sensors handle noise differently.
Larger sensors generally produce cleaner images at high ISO because they collect more light per pixel. However, even the best sensors benefit from proper exposure and shooting discipline.
Understanding the nature of noise allows photographers to make informed decisions about when and how to raise ISO while keeping ISO noise reduction manageable.
Camera Settings That Influence Image Quality
Camera settings play a major role in ISO noise reduction, often even more than post-processing. ISO should never be adjusted in isolation.
It must be balanced with aperture and shutter speed to achieve optimal exposure. Using the lowest possible ISO is always preferable.
Before increasing ISO, photographers should consider opening the aperture to allow more light or slowing the shutter speed when motion blur is not an issue. Proper exposure at capture significantly reduces the need for aggressive noise correction later.
Many cameras include built-in noise reduction settings for high ISO and long exposures. While these can be helpful, excessive in-camera noise reduction may remove fine details and textures. A moderate setting is usually ideal, especially if shooting in RAW format.
RAW files retain far more image data than JPEGs, making them essential for effective ISO noise reduction. Shooting RAW preserves shadow detail and color information, giving greater flexibility during editing without degrading image quality.
ISO Noise Reduction Techniques For Low-Light Photography
Low-light photography demands careful technique to minimize noise before it appears. One of the most effective ISO noise reduction strategies is achieving accurate exposure at the moment of capture.
Underexposed images that are brightened later will always show more noise than properly exposed ones. Using available light intelligently can significantly reduce noise.
Positioning subjects closer to light sources, shooting toward illuminated areas, or using reflective surfaces can increase light intake without raising ISO. Even small adjustments in angle or location can make a noticeable difference.
Stabilization tools also play a critical role. Tripods allow longer shutter speeds, enabling lower ISO values. Image stabilization systems help reduce camera shake, though they do not freeze subject movement.
When possible, combining stabilization with slower shutter speeds greatly improves ISO noise reduction outcomes.
Shooting Techniques To Minimize Noise Without Editing
Many photographers rely heavily on software, but effective ISO noise reduction begins with disciplined shooting techniques.
One powerful approach is exposing slightly brighter without clipping highlights. This method increases signal quality in darker areas, reducing visible noise. Burst shooting is another useful technique.
Taking multiple frames of the same scene allows photographers to select the cleanest image or combine exposures later for noise reduction. This approach is particularly useful for static subjects and night photography.
Accurate focusing also matters. Images that lack sharp focus often require additional sharpening during editing, which can exaggerate noise. Ensuring precise focus minimizes the need for aggressive adjustments later.
Scene selection itself can influence noise visibility. Noise is most noticeable in dark, flat areas. Composing images with varied textures, highlights, or natural contrast can help mask minor noise and improve overall perceived quality.
ISO Noise Reduction In Post-Processing Workflows
Even with optimal shooting practices, some level of noise is unavoidable at high ISO. Post-processing is where ISO noise reduction is refined and balanced against detail preservation.
Noise reduction tools typically separate luminance noise and color noise. Color noise is usually easier to remove without harming detail, while luminance noise requires careful adjustment.
Applying too much luminance reduction can result in a plastic or blurred appearance. Selective noise reduction is far more effective than global adjustments.
Masking allows photographers to target noisy shadows while preserving sharp edges and textures. This technique maintains image realism while improving cleanliness.
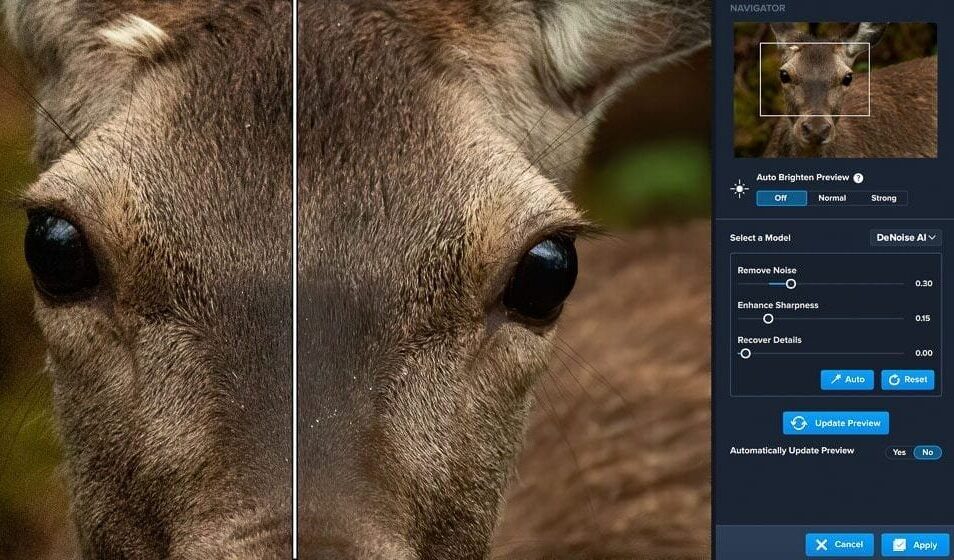
Modern editing software offers advanced noise reduction powered by machine learning. These tools analyze image patterns and intelligently reduce noise while protecting detail. When used moderately, they significantly enhance ISO noise reduction results.
It is important to view images at full resolution when editing. Noise that seems invisible at smaller sizes may become obvious when printed or viewed on large screens. Proper evaluation ensures consistent quality across different outputs.
See you in the next post,
Anil UZUN