Using ISO in photography, mastering exposure is essential to producing professional and visually balanced images. One of the key settings that directly affects exposure is ISO.
Understanding using ISO in photography allows photographers to control the brightness, sharpness, and overall quality of their shots across various lighting conditions.
While many beginners believe ISO is simply a way to brighten photos, its function and impact go far beyond that. ISO influences not only light sensitivity but also the amount of digital noise in your image, which can drastically affect the final result.
Using ISO in photography is all about balancing sensitivity and image quality. In bright daylight, a low ISO value like 100 helps create crisp, clean, and detailed photos.
In darker environments, raising ISO to 800, 1600, or higher can help capture scenes without a tripod or flash.
However, increasing ISO also raises the chance of noise and reduced sharpness. The key is to find the right balance between sufficient exposure and minimal degradation.
This guide explores how ISO works, how it interacts with shutter speed and aperture, how to choose the correct ISO for your environment, and which common mistakes to avoid.
Whether you are shooting landscapes in bright daylight or portraits in low light, understanding using ISO in photography will give you greater control over your creative process.
Using ISO In Photography: What It Is And How It Works
The term ISO originally came from the International Organization for Standardization, which standardized the measurement of film sensitivity in traditional cameras. In the digital era, ISO serves the same purpose it defines how sensitive your camera’s sensor is to light.
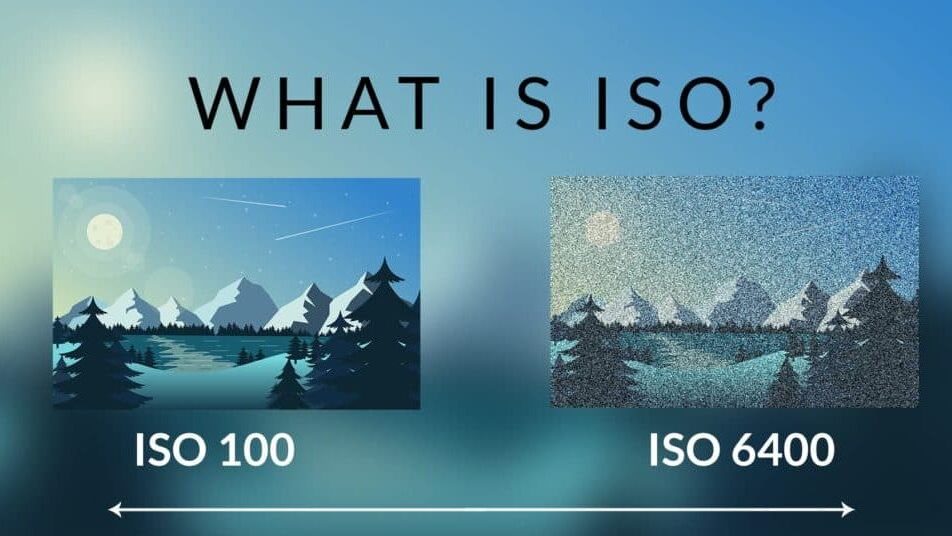
When using ISO in photography, adjusting ISO doesn’t physically increase light; instead, it amplifies the sensor’s signal to make the image appear brighter. ISO values typically range from 100 to 6400 or even higher on modern digital cameras.
Lower values like ISO 100 or 200 are ideal for daylight or studio lighting because they maintain maximum image clarity. Higher values such as ISO 1600 or 3200 are helpful in dimly lit environments but can introduce visible grain or noise.
To visualize this, imagine photographing a landscape on a sunny afternoon at ISO 100. The result is a clean, noise-free image with great detail. Now imagine taking the same shot indoors at ISO 3200.
The scene appears brighter, but the photo may contain speckles or colored dots this is the digital noise caused by amplifying the signal too much. In short, using ISO in photography is about controlling the balance between brightness and noise.
A lower ISO gives you sharper results but requires more light. A higher ISO compensates for poor lighting but sacrifices image quality. Knowing when and how to adjust ISO is the foundation of mastering exposure.
Understanding The Relationship Between ISO, Shutter Speed, And Aperture
Exposure in photography depends on three settings known as the exposure triangle: ISO, shutter speed, and aperture. Understanding how these elements interact is crucial for successfully using ISO in photography.
-
Shutter speed determines how long the sensor is exposed to light. Faster shutter speeds like 1/1000 freeze motion, while slower speeds like 1/30 capture movement or motion blur.
-
Aperture (measured in f-stops) controls the amount of light entering through the lens. A wider aperture (e.g., f/2.8) lets in more light and creates shallow depth of field, while a narrower one (e.g., f/11) limits light but increases background sharpness.
-
ISO controls the sensor’s light sensitivity and is used to compensate when aperture or shutter adjustments alone aren’t enough.
Let’s say you’re shooting indoors without a flash. To get proper exposure, you might open your aperture to f/2.8 and slow your shutter to 1/60.
But if the scene is still too dark, increasing ISO to 800 or 1600 allows you to brighten the image without further changing other settings. When using ISO in photography, remember that every adjustment has trade-offs.
A higher ISO enables faster shutter speeds, which is great for action shots or handheld photography, but it may also add unwanted noise. Conversely, keeping ISO low ensures image clarity but requires sufficient light or a tripod.
Professional photographers often start by choosing the aperture based on artistic intent, then select an appropriate shutter speed for the subject’s movement, and finally adjust ISO last to achieve perfect exposure.
This sequence maintains both creative control and technical precision when using ISO in photography.
Using ISO In Photography: How To Adjust The Right Settings
Finding the ideal ISO setting depends on lighting conditions and your camera’s capabilities. The general rule when using ISO in photography is to use the lowest ISO that gives you proper exposure.
However, different environments require different strategies. In bright outdoor light, ISO 100 or 200 is typically perfect. On a cloudy day or during golden hour, ISO 400–800 might be necessary.
For indoor events, concerts, or evening street photography, ISO values between 800 and 3200 often work best. When shooting at night or in very dark places, you might even go up to ISO 6400 or higher, depending on your camera’s noise performance.
Modern cameras also include Auto ISO settings that automatically adjust sensitivity based on light levels. While convenient, relying too heavily on Auto ISO can sometimes lead to overly high values, resulting in unnecessary noise.
For professional results, manual control is recommended whenever possible. When using ISO in photography, consider your tools too. A tripod can help you maintain a low ISO by allowing slower shutter speeds without camera shake.
Similarly, good lighting setups or reflectors can reduce the need to raise ISO artificially. Ultimately, the correct ISO is about balance. If the scene is too dark, increasing ISO is a practical choice but only to the extent that your image remains clean and detailed.
Learning to judge exposure by sight and experience will help you make quick, confident adjustments in any shooting scenario.
Effects Of ISO On Digital Noise And Image Quality
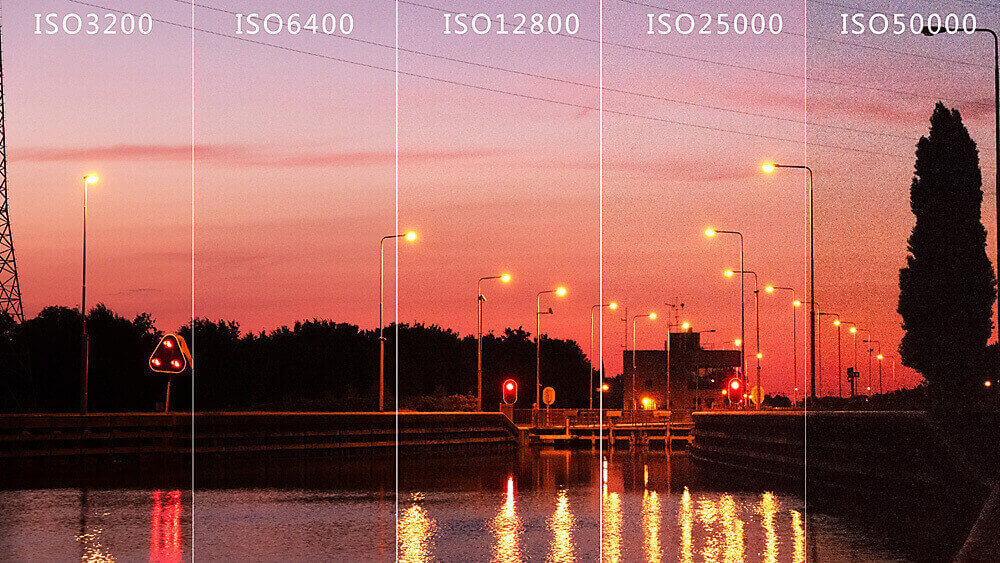
One of the most noticeable side effects of using ISO in photography is digital noise. Noise appears as small colored or gray specks across an image, especially in shadows or dark areas.
It becomes more visible as ISO increases because the camera sensor amplifies not only light but also its internal electronic signal. There are two types of noise that affect image quality.
The first, luminance noise, appears as grainy texture that affects brightness levels. The second, chroma noise, manifests as random color specks. Both can make a photo appear less sharp and less professional.
The best way to manage noise while using ISO in photography is through preventive technique. Always aim for the lowest ISO possible without underexposing your shot. Using a tripod or external light sources helps maintain clean results even in low light.
Shooting in RAW format instead of JPEG also gives you more flexibility to remove noise during post-processing without losing detail. Some cameras feature built-in noise reduction systems, but excessive in-camera noise reduction can blur fine textures.
Post-processing tools like Adobe Lightroom or Capture One allow more control by selectively reducing noise while preserving sharpness. Full-frame cameras generally handle high ISO better than smaller-sensor models.
Their larger pixels collect more light, reducing the need for extreme signal amplification. Understanding how your camera performs at different ISO levels helps you know the limits of acceptable noise for your style of photography.
In conclusion, maintaining a balance between brightness and clarity is the key to successfully using ISO in photography without compromising image quality.
Using ISO In Photography: Common Mistakes To Avoid
Even experienced photographers make errors when adjusting ISO. One of the most common mistakes is assuming that raising ISO is always the quickest way to brighten an image.
While true in principle, overusing high ISO settings often leads to excessive noise and a loss of color accuracy. Another frequent error when using ISO in photography is forgetting to lower ISO after shooting in low-light conditions.
For instance, if you shoot at ISO 3200 indoors and then step outside into daylight without resetting ISO to 100, your next images will be overexposed and lack detail. Many beginners also rely entirely on Auto ISO without understanding how it behaves.
Although Auto ISO can simplify exposure control, it removes creative control from the photographer and may choose values that aren’t ideal for the scene.
Manual ISO adjustment, combined with proper use of aperture and shutter speed, always produces more consistent results. A further mistake is neglecting to test your camera’s noise threshold.
Every camera handles ISO differently, so it is essential to experiment and identify the maximum ISO level at which image quality remains acceptable.
Finally, avoid using ISO as a substitute for proper lighting. Photography is fundamentally about light, and whenever possible, improving lighting conditions is a better solution than pushing ISO limits.
Mastering light and exposure together ensures that using ISO in photography enhances your results instead of degrading them.
See you in the next post,
Anil UZUN