Pan technique is one of the best ways to show real motion in a single photo while keeping your subject sharp and the background naturally blurred.
Instead of freezing action completely, the pan technique adds energy and speed to the image by letting the surroundings streak across the frame.
It works especially well for cars, cyclists, runners, scooters, and street photography moments where movement is part of the story.
The key idea is simple: you move your camera in the same direction and at a similar speed as your subject while taking the shot. When done correctly, your subject stays readable and clear while the background becomes a smooth motion blur.
In this guide, you will learn how to set up your camera, how to practice quickly, and how to fix the most common problems that stop panning shots from looking clean.
What The Pan Technique Is And Why It Creates Motion Blur The Right Way
The pan technique is a tracking method that creates motion blur in the background while keeping the subject sharper than the rest of the scene.
When you follow a moving subject smoothly, your camera movement matches the subject’s movement during the exposure.
Because of that, the subject stays relatively “still” on your sensor, while the background moves quickly across the frame and becomes blurred. This blur is what gives panning photos a professional action feel.
It makes the viewer instantly understand speed, direction, and atmosphere. A cyclist moving through a city street looks faster, a car feels more dynamic, and a runner seems more powerful because the photo has visible motion.
That is the true value of the pan technique: it tells a story with movement instead of simply capturing a subject. It also helps your photos feel less static. Many action photos look sharp but flat because everything is frozen.
With the pan technique, the subject stands out more clearly, and the motion blur adds depth, style, and emotion.
Camera Setup Essentials: Shutter Speed, Focus Modes, And Stabilization
Shutter speed is the most important setting for the pan technique because it controls how much motion blur appears.
If the shutter speed is too fast, the background will look sharp and you will lose the motion effect. If it is too slow, your subject will become blurry and the photo will look messy.
A good starting range depends on the subject:
-
Runners or slow cyclists: 1/160 to 1/125
-
Cyclists or steady street action: 1/125 to 1/80
-
Cars at normal street speed: 1/80 to 1/50
-
Faster vehicles: 1/60 to 1/40 (harder, more blur)
If you are new, start at 1/125 and slowly test lower speeds as you improve.
For focus, continuous autofocus is usually the best option because the subject is moving. If your camera supports tracking autofocus, it can help a lot.
If autofocus struggles, you can also try pre-focusing on a spot and shooting as the subject passes that area, which works well for predictable subjects like cars passing on the same road line.
Stabilization can help, especially if your camera or lens has a panning-friendly stabilization mode. However, even without stabilization, you can get strong results by improving your movement and timing.
Keep ISO and aperture balanced so you maintain proper exposure at your chosen shutter speed.
Pan Technique Practice Drills: Cars, Cyclists, Runners, And Street Scenes
The best way to improve at the pan technique is to practice with consistent subjects. Cars are one of the easiest starting points because their movement is smooth and predictable.
Choose a safe location and begin tracking the car before it reaches the perfect point in your frame. Your movement should already match its speed before you press the shutter.
Cyclists are a great next step because they move at a medium speed and are easier to frame closely. Start around 1/125 and focus on keeping the rider’s head and upper body sharp.
Wheels naturally blur and look great in panning shots, so do not worry if they are not fully sharp. Runners are harder because their movement is less stable. Arms and legs move in different rhythms, which creates more chances for blur.B
egin with 1/160 and work down to 1/125 once you get smoother tracking. Street scenes are perfect for creativity. You can pan scooters, skateboarders, bikes, or even people walking fast through busy areas.
The background matters a lot here. Trees, signs, street lights, and buildings create stronger blur patterns than a plain wall. If you want the effect to look more cinematic, choose backgrounds with texture and contrast.
A strong drill is to shoot the same subject with multiple shutter speeds like 1/160, 1/125, 1/100, 1/80, and compare which one gives the cleanest subject with the best blur.
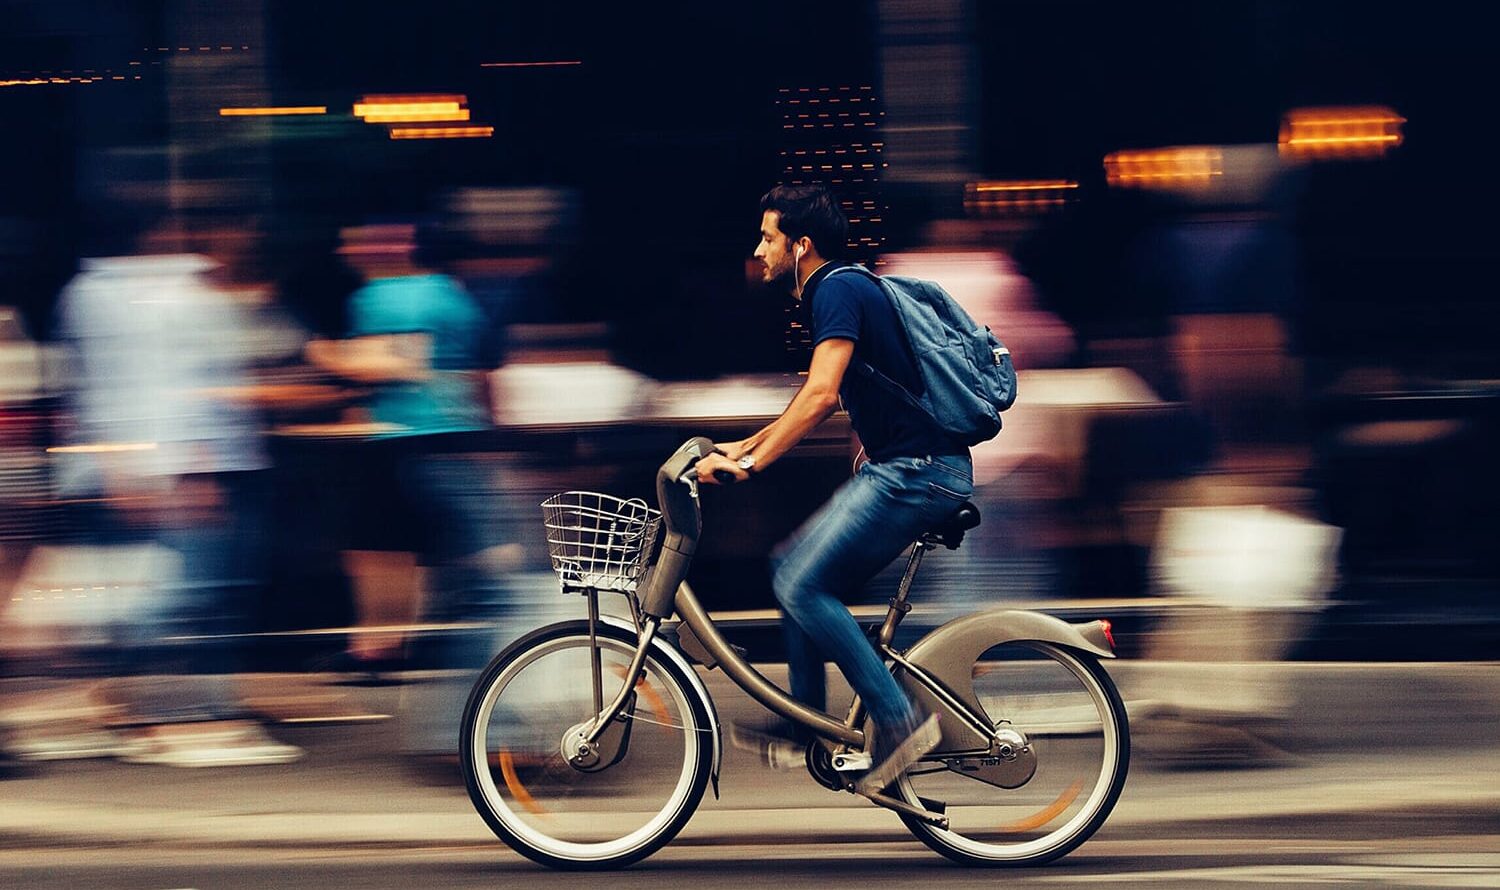
Tracking And Timing: Smooth Body Movement, Framing, And The Follow Through
![]()
Panning is not only a camera setting skill, it is also a body movement skill. The biggest mistake beginners make in the pan technique is panning with only their arms.
This creates shaky movement and inconsistent blur. Instead, keep your elbows close and rotate your body smoothly from the waist while tracking the subject. Start tracking early, not at the last moment.
When the subject enters your frame, your camera movement should already be smooth and matched to the subject speed. This increases sharpness immediately. Framing matters too.
Always leave space in front of the moving subject. This makes the photo feel natural and shows direction. If the subject is too centered or too tight, the shot loses the sense of travel and can look uncomfortable.
The follow-through is a must in the pan technique. Many people stop moving as soon as they hear the shutter click. That sudden stop creates blur on the subject.
You should keep moving smoothly even after the shot is taken, like continuing the motion for a second after pressing the shutter. Burst shooting can also help because timing changes slightly between frames.
A short burst of 2 to 4 photos increases your chance of getting one strong, sharp frame with perfect blur.
Pan Technique Mistakes And Fixes: Missed Focus, Camera Shake, And Inconsistent Blur
Missed focus is one of the most common problems in the pan technique. This often happens when autofocus locks onto the background.
The fix is using continuous autofocus, choosing a better focus area mode, or pre-focusing on a specific point where your subject will pass.
Camera shake usually happens when your shutter speed is too slow for your current skill level. If your subject is blurry and the blur looks uncontrolled, increase your shutter speed slightly.
For example, if 1/60 is too difficult, go back to 1/80 or 1/100 and rebuild confidence. Inconsistent blur often comes from inconsistent tracking speed. If you move too fast or too slow compared to the subject, your blur pattern becomes messy.
Track early, stay smooth, and match the motion naturally. The more you repeat the movement, the easier it becomes. Another major mistake is stopping your motion at the shutter press. This ruins sharpness instantly. Always remember the follow-through.
It is one of the most important habits in the pan technique and it is what separates clean shots from blurry ones. Lastly, remember that panning has a lower keeper rate than normal shooting.
Even experienced photographers do not get perfect results every time. The goal is to improve consistency. With practice, you will quickly start producing sharp subjects with smooth cinematic blur that makes your action photos stand out.
See you in the next post,
Anil UZUN