Photography is a magnificent blend of art and technology. However, sometimes conventional shooting techniques can be limiting and restrict our creativity. This is where experimental photography techniques come into play.
These techniques allow us to achieve unexpected results by looking from unusual angles. In this article, we’ll explore some ways to unleash creativity in photography by pushing traditional boundaries.
Playing with Light:
Light is fundamental to photography, and manipulating it can turn ordinary scenes into extraordinary ones. By using reflections, manipulating shadows, or changing light sources, you can create unusual compositions. For example, observing how a prism refracts light and creates a dance of colors can yield intriguing results.
Capturing Motion:
Capturing motion is an important way to capture the essence of a photograph. However, instead of freezing motion, sometimes you can achieve a different effect by blurring or leaving traces of movement. You can try techniques like capturing light trails in night scenes using long exposure, or photographing a moving object to leave trails behind.
Multiple Exposures:
Multiple exposure technique allows overlaying multiple images onto the same frame. This adds depth and layering to your photographs. Combine different concepts to tell a new story or take a journey through time by capturing a moving object in different poses.
Alternative Lenses:
Using different optical devices beyond traditional lenses can give your photos a unique look. For instance, you can capture reflections using a mirror or create interesting effects by placing a prism in front of your lens to alter light. Experiment with various materials and see what works best for you.
Digital Manipulation:
Another aspect of experimental photography is digital manipulation. By processing your photos using computer software, you can unleash your imagination by changing colors, manipulating textures, and more. However, be mindful to maintain a natural look and not to lose the essence of the photograph.
Long Exposure Photography: Capturing Motion and Light Trails
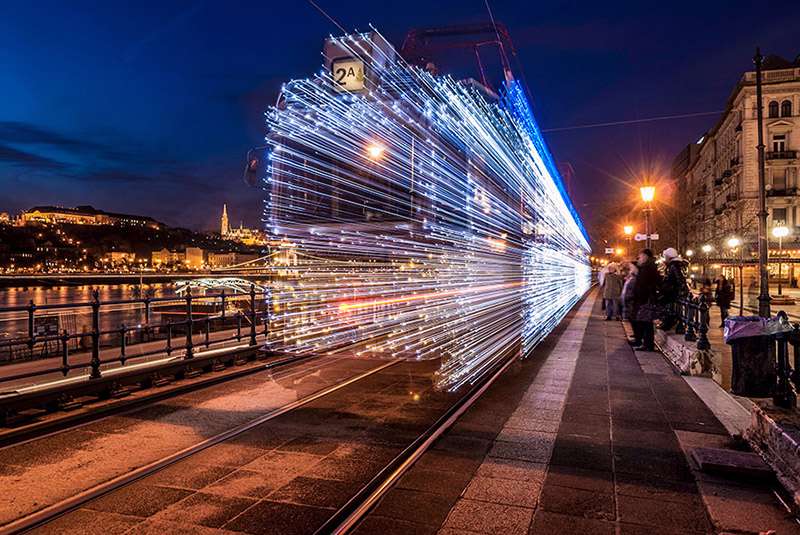
Long exposure photography is a technique where the camera captures a subject over an extended period. This technique is used to capture the trails of moving elements or changing light conditions. It’s ideal for capturing the soft flow of rapidly moving water, light trails of objects like lightning at night, or even the light trails of vehicles in traffic.
Preparation and Equipment:
Before starting long exposure shots, it’s essential to gather the right equipment. Using a tripod helps stabilize your camera for sharp and shake-free photos. Additionally, experimenting with additional equipment like long exposure filters can help you achieve more dramatic results by reducing light and allowing for longer exposure times.
Settings and Techniques:
Determining the correct exposure time is critical for long exposure shots. Keeping the ISO setting low, shrinking the aperture (using a high f-stop value), and extending the exposure time generally yield the best results. Experiment with various combinations by working in manual mode and adjusting the exposure time until you achieve the desired effect.
Capturing Motion:
Long exposure is an excellent technique for capturing the trails of moving elements. For example, you can soften the flow of water by using long exposure or express movement by leaving traces behind, such as capturing the movement of a bicycle or vehicle.
Light Trails:
In night photography, trails of light from light sources provide creative and impressive images. You can choose busy roads or passing trains at night to capture these trails. With careful composition and correct exposure settings, light trails offer stunning visuals.
Experimental Approaches:
Long exposure photography not only captures basic motion and light trails but also encourages experimental approaches. For instance, by moving the camera or adding different filters to your lens, you can achieve unique effects. Enhance your creativity by adding a unique touch to your photos.
Multiple Exposures: Layering Images for Surreal Effect
Multiple exposures involve overlaying multiple images onto the same frame, creating a surreal effect. This technique offers a perfect way to add a surreal atmosphere to your photos. Combine different scenes to create a new reality and transport the viewer beyond the limits of imagination.
Preparation and Planning:
Before starting multiple exposure shots, it’s important to make a plan. Think about which scenes to combine and what story you want to tell. Learn how to use your camera’s multiple exposure mode and select a manual mode if necessary.
Subject Selection:
Choosing interesting and contrasting scenes is key to achieving impressive results in multiple exposure shots. For example, by combining a natural landscape with a human figure, you can create a surreal environment. Create an interesting contrast by using different textures, patterns, and colors.
Exposure Times and Layers:
In multiple exposures, determining how long each image will be exposed is crucial. Plan each layer carefully and adjust the exposure times to achieve the desired effect. With different exposure times, you can control how sharp or blurred each layer will be.
Experimental Approaches:
The multiple exposure technique not only creates layered images but also encourages experimental approaches. For example, you can use different filters or change exposure settings to achieve various effects. By creating contrasts between infrared and traditional photography, you can tell interesting visual stories.
Reviewing and Editing:
After multiple exposure shots, carefully review the results and make any necessary adjustments. You can enhance the images by adjusting colors, contrast, and brightness. However, be careful not to over-edit and maintain a natural feel to preserve the surreal effect of the photographs.
Infrared Photography: Revealing Hidden Worlds in the Spectrum
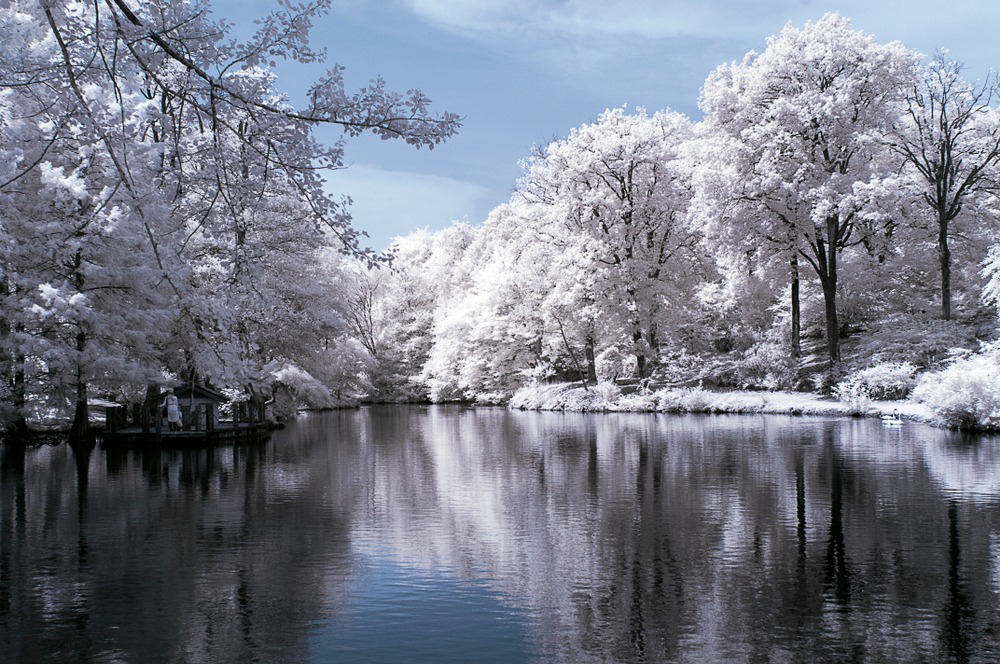
Infrared photography is a rare type of photography that goes beyond the visible light spectrum used in traditional photography. This technique uses infrared light waves that are not perceptible to the human eye, offering a different perspective of the world around us.
Foundations of Infrared Photography:
Infrared photography is achieved by using a special film or digital sensor that records infrared light waves normally invisible to the human eye.
This wavelength is different from the visible light spectrum used in traditional photography and reflects different materials in unique ways, creating surreal and unique images.
Equipment and Preparation:
Having suitable equipment for infrared photography is essential. You can use infrared filters or a dedicated infrared-sensitive digital camera. Using a tripod to capture infrared light more effectively can help you take sharp and shake-free photos.
Landscape and Composition:
Infrared photography offers a different view of landscapes and natural elements. Plants and the sky, for example, reflect infrared light in different ways. Therefore, it’s important to choose landscapes suitable for infrared photography and create interesting compositions.
Color and Contrast:
In infrared photography, a rare and surreal color palette is used instead of traditional colors. These colors are often pale pink, purple, and white tones.
Additionally, high-contrast images caused by infrared light are often seen. You can adjust colors, contrast, and brightness to highlight these color and contrast effects.
Creativity and Experiments:
Infrared photography offers an excellent opportunity for creative expression. You can achieve various effects by using different filters or changing exposure settings. By creating contrasts between infrared and traditional photography, you can tell interesting visual stories.
Light Painting: Creating Art with Light and Movement
Light painting is an unusual and creative technique in photography. In this technique, patterns and shapes are created with the movement of light sources using long exposure times. The results can be enchanting and visually impressive.
Preparation and Equipment:
Before starting light painting, it’s essential to gather the necessary equipment. Use a tripod to keep your camera in a stable position and prevent shaking. Additionally, you can use various light sources, flashlights, LED lights, and even fire to create effects.
Settings and Techniques:
Long exposure times are required for light painting. By keeping the ISO setting low (usually ISO 100 or 200), shrinking the aperture (using a high f-stop value), and extending the exposure time (from a few seconds to minutes), you can capture light movement. Experiment with different combinations by working in manual mode and adjusting the exposure time until you achieve the desired effect.
Movement and Creativity:
Light painting is a great way to unleash your creativity by pushing your boundaries. Create interesting patterns using different light sources and movement patterns. You can create stunning and unique images with various movements. For example, you can create circles by spinning a flashlight or leave traces by following a moving object.
Contrast and Composition:
Contrast and composition are essential in light painting shots. Create an interesting balance by combining bright and dark areas. Also, create a dynamic composition by following the movement of light. Consider the elements around you with the movement of light and make your photo visually appealing.
Editing and Results:
After light painting shots, carefully review the images and make any necessary adjustments. You can enhance the effects by adjusting colors, contrast, and brightness. However, be careful not to over-edit and maintain a natural and organic feel to your photo.
Lens Whacking and DIY Filters: Innovative Approaches to Lens Manipulation
Photography offers endless possibilities for pushing the boundaries of creativity and experimentation. Lens manipulation is a way to achieve unique and impressive images by surpassing traditional limits.
Lens Whacking:
Lens whacking is a technique where the lens is partially or completely detached from the camera or lightly shaken.
This method allows light to leak into the lens, creating unique flares and soft focus effects. The movement of the camera and the playfulness of light while shaking the lens provide impressive and artistic results.
DIY Filters:
DIY filters are a way to create simple and impactful effects with materials found at home.
For example, you can create a textured filter with glass or plastic bottles in front of your camera, or create bokeh circles around the lens using a pair of pants elastic. This technique, limited only by your imagination, allows you to add unique and personal touches.
Preparation and Experience:
Preparing for lens manipulation and gaining experience is important. Be careful when lens whacking and take protective measures if necessary to prevent damage to your lens.
When creating DIY filters, experiment with various materials and discover which effects yield the best results.
Composition and Creativity:
Lens manipulation is not just a technical technique but also a way to express your creativity. Consider composition and determine which effects best tell your story.
Explore the enchanting world of light and movement and add a unique touch to your photos.
Reviewing and Sharing Results:
Carefully review the results of lens manipulation and don’t hesitate to share your best work. Share your experiences with other photographers and inspire them to discover their creative potential. Additionally, by receiving feedback and sharing your experiences, you can improve yourself.
See you in the next post,
Anil UZUN